Showing posts with label easy projects. Show all posts

How to Make a Basic Hair Bow by Pink Poodle Bows

Pink Poodle Bows is on YouTube! We will be adding more videos on sewing, handmade clothing, and other DIY projects for moms! My YouTube channel is called PinkPoodleBows (one word), help me increase my channels popularity and the number of viewers by spreading the news. Thanks!


Thank you,
Alisha

Felt Tutorial, Monster and Robot


These are some silly new characters on Nickelodeon that my daughters asked me to make dolls of for them.  This project probably cost less than $5 in felt to make and I was able to make both of them a Robot and Monster doll each.  

I started by drawing some patterns on my computer, but then I decided to wing the rest of them because they were not coming out the way I wanted them to. 


After all their parts were cut out, I used fabric tac to glue them to the body, sewed the sides and stuffed them.  I love felt, it's so easy to work with!  


Alisha

Free PDF Tutorial Angry Bird and Monster Tissue Holder


Here are some tissue holder tutorials just in time for those cold months ahead! These are quick projects for your to sew as gifts and stocking stuffers!  I created two separate tutorials showing how to create the monster tissue holders and the "angry" bird tissue holder. Just click on one of the highlighted links to receive the project instructions. I Hope you enjoy them and happy sewing!
Alisha

Free Tutorial, Pirate Corset Belt

Free Tutorial, Pirate Corset Belt

Easy Sewing Project


Pirate Corset Belt

My four year old daughter is going on a Disney Cruise next month with her grandparents and one of the dinners has a pirate theme.  This was the dress I came up with for her to wear to dinner, and it has multiple uses as well.  The dress can be worn separately as a "Minnie Mouse" dress and the chevron fabric is actually a separate skirt that I used to layer over the dress to complete the "pirate" dress look.  


To make the corset belt I measured my daughter's waist, which was 20".  I decided to cut it 4" shorter to leave some space for the ribbon to be tied across her waist, therefore I cut the belt fabric 16" wide by 4" in length (x2 pieces).  To make the ruffle, I used a 3" x 60" piece of red fabric and to make the loops I used four pieces of ½" wide ribbon cut about 3" long.  The satin ribbon pictured above is what I used to thread through and tie the belt together.  

Free PDF Sewing Pattern, Fabric Bow Holder


This is our latest free tutorial. It is a free PDF sewing pattern that gives detailed instructions and the necessary pattern pieces. Click on the link below to download this pattern. 
Fabric Bow Holder
Unfortunately the site that we use to provide our free PDF tutorials requires us to sell the pattern for 1 cent. Sorry, this is an issue that we are trying to resolve. 
Alisha

Girls Knot Dress PDF Sewing Pattern

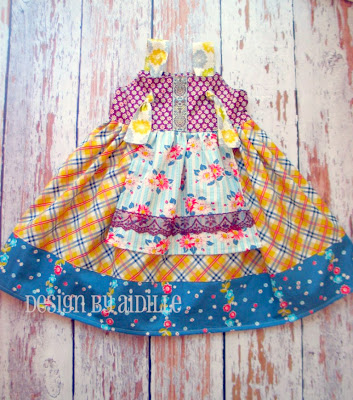
Isn't this dress so beautiful!  A customer sent me this photo of her knot dress that she made using our Ava Knot Dress PDF sewing pattern and I just had to share!  I love the coordinating fabrics and the ribbon and lace!  She has a shop on Etsy as well at www.etsy.com/shop/aidille and her own website at www.aidille.com if you want to check out her other beautiful creations!

Knot Dress

Easy PDF Sewing Pattern; E-Reader Cover Clutch

I've got one more e-reader cover sewing pattern for you and this one takes only two fat quarters of fabric for Kindle and Nook products!  This one is super quick, easy and super cute!  With two closure options of velcro or ribbon...or both, this is a project you can do in under an hour!  I love this one the best for it's simplicity and functionality!


Can't decide?  Why not get all three!  I'm offering a bundle package in my Etsy shop for all three e-reader covers for $12.  These are great gifts as well and the iPad version in the e-reader #2 and sleeve patterns are large enough to carry a wipe case and diapers for those quick runs to the store!  

E-Reader Cover and Sleeve PDF Sewing Pattern

Something fun and new!  My latest sewing patterns are padded e-reader covers!  This is a fun way to personalize your cover for your e-reader: Kindle, iPad, Nook and protect it as well!  I made two options: an e-reader cover and an e-reader sleeve.  Both have two closure options and the cover has two pocket options.   These would make a great gift as well!


Peasant Dress Sewing Pattern, Printable Pattern

I had a lot of fun creating this peasant dress pattern and sewing my girls Halloween dresses with it!  I wanted something that would give many options, such as a long sleeve or a shorter 3/4" sleeve, ruffles at the bottom or no ruffles, and I also show how to make the sleeves in a variety of ways!  Here are some pics of my girls modeling their new dresses at the pumpkin patch, along with some other samples of what you can create with this pattern!


Owl Hat Sewing Pattern

I'm so excited to introduce you to my newest pattern, fleece aviator hats!  These were so fun to make and there are so many options!  I created this pattern with the options of turning it into an owl hat with the options of the ears being placed between the band and the crown, or in the crown itself.  I also included a pattern on how to turn it into an aviator hat with goggles!  And how fun would it be for a little boy to have the aviator hat with goggles and owl ears!  This is perfect for winter and don't forget to check back because I have some other patterns that are almost ready for release! 


Free Tutorial Owl Costume Body


I have been working on creating costumes for my two daughters for Halloween.  I know it's a little early, but if I don't start on it now, I know I will be in panic mode trying to cram it in later!  I was showing my three year old pictures of costumes and I was hoping she would pick something easy for me to make like a ghost, lol!  But sure enough, she wanted to be something that I would have to put some thought into...she picked an owl!  So after drawing out my designs, then thinking of how I was going to make this owl, I finally got to work.   This is what I did to make the body.  You will have to forgive me for the pictures, I did this at night when my girls went to bed.

I ordered about 1/2 yard of the pink fleece, 1/2 yard of white fleece, 1 yard of tan fleece and 1 1/2 yards of the dark brown fleece from Fabric.com, love them.  I don't think you have to prewash fleece before sewing but I did anyways.  I am sewing two costumes, one for a three year old and one for an 18 month old, so depending on the size of your child, you will probably not need as much fleece as I ordered.

If you haven't tried sewing with fleece you should definitely try it because it is so much fun!  Fleece doesn't fray, so you don't need to finish your edges.  It is forgiving and sews amazingly around curves.  Some things to note: It is sometimes difficult to tell which is the "right" and "wrong" side of fabric, but it you tug on the stretchy side, it will curl towards the "wrong" side of fabric.  Also, it is pretty plush, so it is easier to see your pins if you use the ones with a colored ball on the end and using a "baste" stitch is preferred.

First, I folded my dark brown fleece in half and picked a dress of my daughters to use as my pattern, then I cut around the dress, leaving about an 1" extra around a little extra room in the costume.
Next, I folded one of the body pieces in half to cut out the center.  I cut it out similar to what a pear would look like cut in half.  I used that cut portion as a template to cut out the tan fleece that I wanted for the center of the body, leaving about 1/2" extra around for seam allowance. Make sure that the tan "belly" fabric is also folded in half.


The next step was to sew them together, so I placed the right sides of fleece together as pictured below and placed a pin in the center, then I pulled the dark brown part up to pin around the tan belly piece because it is easier to pin them together that way.  Sew them together using a 1/4" seam allowance. 


On the back of the body piece, I cut a slit down the center around 5" long, then placed the two body pieces right sides together and pinned the sides and sewed the sides only using a 1/4" seam allowance.  DO NOT SEW the armholes.  You will have to sew across the top of the body where the shoulders will be as well.


 You can leave your costume body like this is you choose, that is the beauty of fleece!  I chose to sew around the armholes, neckline, bottom opening and add ribbon to the back to tie with.  Fleece is great because I just folded the amount I wanted on the inside of the armholes and pinned, then sewed around them.


 For the neckline I folded the 5" slit a little towards the wrong side of fabric and pinned, then I sewed around that curve.  Then I folded the neckline in about 1/2" in towards the wrong side and placed my ribbons in on the open ends and pinned.  I sewed the neckline and backstitched over the ribbon a few times.


To finish the costume body, I folded the bottom up about 1" towards the wrong side and sewed around the edge, leaving about a 1" opening to thread my elastic through.  I used a piece about 20" long for my 3 year old. 


I think it turned out pretty cute!  I'll post pics of my girls wearing their costumes when they are completed!  Next post: wings!