Showing posts with label girls. Show all posts

Free Tutorial, Pirate Corset Belt

Free Tutorial, Pirate Corset Belt

Easy Sewing Project


Pirate Corset Belt

My four year old daughter is going on a Disney Cruise next month with her grandparents and one of the dinners has a pirate theme.  This was the dress I came up with for her to wear to dinner, and it has multiple uses as well.  The dress can be worn separately as a "Minnie Mouse" dress and the chevron fabric is actually a separate skirt that I used to layer over the dress to complete the "pirate" dress look.  


To make the corset belt I measured my daughter's waist, which was 20".  I decided to cut it 4" shorter to leave some space for the ribbon to be tied across her waist, therefore I cut the belt fabric 16" wide by 4" in length (x2 pieces).  To make the ruffle, I used a 3" x 60" piece of red fabric and to make the loops I used four pieces of ½" wide ribbon cut about 3" long.  The satin ribbon pictured above is what I used to thread through and tie the belt together.  

Free PDF Sewing Pattern, Fabric Bow Holder


This is our latest free tutorial. It is a free PDF sewing pattern that gives detailed instructions and the necessary pattern pieces. Click on the link below to download this pattern. 
Fabric Bow Holder
Unfortunately the site that we use to provide our free PDF tutorials requires us to sell the pattern for 1 cent. Sorry, this is an issue that we are trying to resolve. 
Alisha

Girls Knot Dress PDF Sewing Pattern

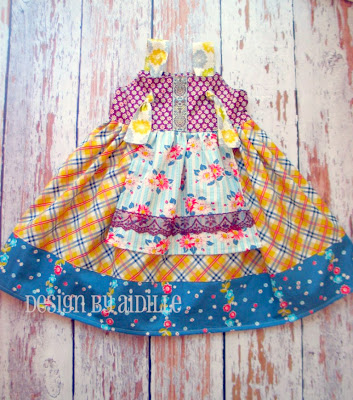
Isn't this dress so beautiful!  A customer sent me this photo of her knot dress that she made using our Ava Knot Dress PDF sewing pattern and I just had to share!  I love the coordinating fabrics and the ribbon and lace!  She has a shop on Etsy as well at www.etsy.com/shop/aidille and her own website at www.aidille.com if you want to check out her other beautiful creations!

Knot Dress

Reverse Knot Dress PDF Sewing Pattern

I love three day weekends!  I finally had a chance to catch up on some sewing projects that I have been wanting to work on!  I made my friend's daughter a dress for her upcoming birthday and I loved it so much that I am going to make my girls some just like it! I think this would be a fun dress to wear to a visit to the zoo!  


Reverse Knot Dress Sewing Pattern

I wanted to create a reverse knot dress that was different from the rest...so this is what I came up with, The Olivia Reverse Knot Dress!  It has a criss cross bodice so that you can add a lot of different fabric combos for that unique boutique look.  I built the straps into the front bodice pattern so that it is a quick sew and the straps are long enough to tie into a bow in the back.  The bodice can even be a great space for appliqués or for adding a fabric flower.  I am planning on making my youngest daughters birthday dress out of this pattern so I'll post a pick when I complete it!  Here are some examples from some of my wonderful pattern testers!  


Peasant Dress Sewing Pattern, Printable Pattern

I had a lot of fun creating this peasant dress pattern and sewing my girls Halloween dresses with it!  I wanted something that would give many options, such as a long sleeve or a shorter 3/4" sleeve, ruffles at the bottom or no ruffles, and I also show how to make the sleeves in a variety of ways!  Here are some pics of my girls modeling their new dresses at the pumpkin patch, along with some other samples of what you can create with this pattern!


Free Tutorial Upcycled Jean Skirt for Toddlers


I have a lot of jeans that are not the right length anymore for my daughters, so I thought it would be fun to turn some jeans into skirts to get a little more use out of them!  I did a google search but I actually had a hard time finding "how to's" for upcycled toddler jean skirts.  I am by no mean's the "first" person to do this, but this how I made my jean skirts.

I cut just below the crotch area first so they looked like shorts.  Then I opened up the crotch area cutting along the seam line in the middle.

I wanted the jeans to be more of the "band" part, and not a entire jean skirt, so I folded the skirt in half, making sure to line the crotch area together and used the back part of the jeans as a straight edge.   I cut across about 1/2" under the pockets to make sure I would have enough room for the seam allowance and followed the line on the mat to make sure I was cutting straight across.


The next step was to open up the jeans and check the length, which was 7" and the width was 12". I wanted an 11" skirt for my 3 year old so 11"desired length - subtract 7" that I already have = 4" needed, and I added 2" to that for the seam allowance, so that makes the length of the ruffles 6" length x 24 width_( I used double the width of the jeans).  CUT 2.  Why 2" more to the ruffles length?  Because you will loose an inch when you sew the jeans to the ruffles where they join, and you will loose an inch when you make your bottom hem for your skirt.  And yes, I did cut the bottom off my pockets, you can probably pin them up out of the way to avoid cutting them...I forgot about them actually...oops, it's an easy fix though.


Press the bottom width of the ruffles 1/2" towards the wrong side, then another 1/2" on both pieces.  Put the ruffles on top of each other, right sides together and sew one of the lengths (short sides) together. Finish with your favorite finishing stitch, I used a wide zigzag. Press.


Baste stitch across the top width of the ruffles (long side that is not pressed), tie the stings together and knot on one end, then pull your bottom bobbin thread as you push your ruffle down to "ruffle" it.  You want to even your ruffles out and make sure they are about the same width as your jeans.  The picture below shows the ruffles folded in half along the seam line and when you do this, make sure you leave about 1/2" extra for each ruffle on the open end because you will need that for your seam allowance when you sew them together.


Pin the ruffles right sides together and sew the other side lengths (short sides) together.
The jeans should be right side out and the ruffles should be inside out, and positioned as you see in the picture below.  Slide the ruffles onto the jeans and place the raw sides together and pin, making a tube with both pieces. Make sure the seam lines all line up.  Sew around the tube using a 1/2" seam allowance, back stitch when beginning and ending.  Finish along the edge with a wide zigzag.  See my pockets are sewn once again. ;)   Sew the bottom hem and you are done!


Here are the best pics I could get of my 3 year old wearing her skirt.  She does not like taking pictures for me and she thought it would be funny to leap over her chair for these pictures!  My 16 month old however doesn't run from me...yet!


Free Apron Tutorial, Basic Apron Pattern

Basic Apron Tutorial

Free Apron TutorialApron Pattern


Adult, Child and Doll Basic Apron Pattern
Materials: Adult’s Apron: 1 yard of fabric Child’s Apron: 1⁄2 yard fabric Doll’s Apron: 1 quarter of fabric Sewing machine, Thread Bobbin, Scissors, Iron, Pins
Size
Apron
(cut 1)


L      W
Bias tape (x2)


L     W
Pocket Main fabric
(cut 1)
L      W
Pocket top strip
(cut 1)

L     W
Pocket middle strip
(cut 1)
L     W
Adult
(one size)
30”x25”
42"x 2”
10” x17”
3”x17”
2”x 17”
Child
 (one size)
21”x17”
36”x2”
7”x 10”
 
3” x 10”
2”x 10”
doll
12”x 9”
18”x2”
3” x 6”
3” x 6” 
2”x 6”


Terms: (bs) backstitch when starting and ending.
(rsf) right side of fabric
(wsf) wrong side of fabric

Step One: Cut Your Pattern and fabric. You will need one apron piece, two bias tapes, one pocket piece and the two fabric strips at the top of the pocket.


Step Two: Cutting Your Armholes and Ironing
a) Fold your apron in half lengthwise, (wsf) towards each other. Put the
fold of fabric on the left side.
b) Place your armhole pattern at the top right side, making sure the straight edges line up along the open ends of the fabric. Pin in place.
c) Cut out your armhole.