 I had a lot of fun creating this peasant dress pattern and sewing my girls Halloween dresses with it! I wanted something that would give many options, such as a long sleeve or a shorter 3/4" sleeve, ruffles at the bottom or no ruffles, and I also show how to make the sleeves in a variety of ways! Here are some pics of my girls modeling their new dresses at the pumpkin patch, along with some other samples of what you can create with this pattern!
Peasant Dress Sewing Pattern, Printable Pattern
 I had a lot of fun creating this peasant dress pattern and sewing my girls Halloween dresses with it! I wanted something that would give many options, such as a long sleeve or a shorter 3/4" sleeve, ruffles at the bottom or no ruffles, and I also show how to make the sleeves in a variety of ways! Here are some pics of my girls modeling their new dresses at the pumpkin patch, along with some other samples of what you can create with this pattern!
Owl Hat Sewing Pattern
I'm so excited to introduce you to my newest pattern, fleece aviator hats! These were so fun to make and there are so many options! I created this pattern with the options of turning it into an owl hat with the options of the ears being placed between the band and the crown, or in the crown itself. I also included a pattern on how to turn it into an aviator hat with goggles! And how fun would it be for a little boy to have the aviator hat with goggles and owl ears! This is perfect for winter and don't forget to check back because I have some other patterns that are almost ready for release!
Free Tutorial Owl Costume Body
I have been working on creating costumes for my two daughters for Halloween. I know it's a little early, but if I don't start on it now, I know I will be in panic mode trying to cram it in later! I was showing my three year old pictures of costumes and I was hoping she would pick something easy for me to make like a ghost, lol! But sure enough, she wanted to be something that I would have to put some thought into...she picked an owl! So after drawing out my designs, then thinking of how I was going to make this owl, I finally got to work. This is what I did to make the body. You will have to forgive me for the pictures, I did this at night when my girls went to bed.
I ordered about 1/2 yard of the pink fleece, 1/2 yard of white fleece, 1 yard of tan fleece and 1 1/2 yards of the dark brown fleece from Fabric.com, love them. I don't think you have to prewash fleece before sewing but I did anyways. I am sewing two costumes, one for a three year old and one for an 18 month old, so depending on the size of your child, you will probably not need as much fleece as I ordered.
If you haven't tried sewing with fleece you should definitely try it because it is so much fun! Fleece doesn't fray, so you don't need to finish your edges. It is forgiving and sews amazingly around curves. Some things to note: It is sometimes difficult to tell which is the "right" and "wrong" side of fabric, but it you tug on the stretchy side, it will curl towards the "wrong" side of fabric. Also, it is pretty plush, so it is easier to see your pins if you use the ones with a colored ball on the end and using a "baste" stitch is preferred.
First, I folded my dark brown fleece in half and picked a dress of my daughters to use as my pattern, then I cut around the dress, leaving about an 1" extra around a little extra room in the costume.
Next, I folded one of the body pieces in half to cut out the center. I cut it out similar to what a pear would look like cut in half. I used that cut portion as a template to cut out the tan fleece that I wanted for the center of the body, leaving about 1/2" extra around for seam allowance. Make sure that the tan "belly" fabric is also folded in half.
The next step was to sew them together, so I placed the right sides of fleece together as pictured below and placed a pin in the center, then I pulled the dark brown part up to pin around the tan belly piece because it is easier to pin them together that way. Sew them together using a 1/4" seam allowance.
On the back of the body piece, I cut a slit down the center around 5" long, then placed the two body pieces right sides together and pinned the sides and sewed the sides only using a 1/4" seam allowance. DO NOT SEW the armholes. You will have to sew across the top of the body where the shoulders will be as well.
For the neckline I folded the 5" slit a little towards the wrong side of fabric and pinned, then I sewed around that curve. Then I folded the neckline in about 1/2" in towards the wrong side and placed my ribbons in on the open ends and pinned. I sewed the neckline and backstitched over the ribbon a few times.
To finish the costume body, I folded the bottom up about 1" towards the wrong side and sewed around the edge, leaving about a 1" opening to thread my elastic through. I used a piece about 20" long for my 3 year old.
I think it turned out pretty cute! I'll post pics of my girls wearing their costumes when they are completed! Next post: wings!
PDF Sewing Patterns
I just started my first day back to teaching on Thursday! It seems like the school year comes earlier and earlier every year! I have a great group of first graders and they are just too cute!
I wish I had more time to do all the things that I want to do! I am currently working on two skirt patterns that I hope to release soon and I have a few new long sleeve dress and pants ideas...but I am always looking for new ideas if anyone has any suggestions. :) Here's a sneak peak at the skirt patterns.
Free Tutorial Upcycled Jean Skirt for Toddlers

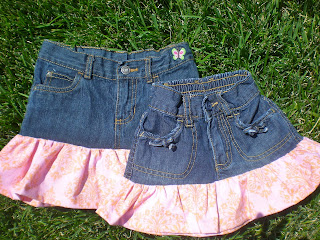
I have a lot of jeans that are not the right length anymore for my daughters, so I thought it would be fun to turn some jeans into skirts to get a little more use out of them! I did a google search but I actually had a hard time finding "how to's" for upcycled toddler jean skirts. I am by no mean's the "first" person to do this, but this how I made my jean skirts.
I cut just below the crotch area first so they looked like shorts. Then I opened up the crotch area cutting along the seam line in the middle.
I wanted the jeans to be more of the "band" part, and not a entire jean skirt, so I folded the skirt in half, making sure to line the crotch area together and used the back part of the jeans as a straight edge. I cut across about 1/2" under the pockets to make sure I would have enough room for the seam allowance and followed the line on the mat to make sure I was cutting straight across.
The next step was to open up the jeans and check the length, which was 7" and the width was 12". I wanted an 11" skirt for my 3 year old so 11"desired length - subtract 7" that I already have = 4" needed, and I added 2" to that for the seam allowance, so that makes the length of the ruffles 6" length x 24 width_( I used double the width of the jeans). CUT 2. Why 2" more to the ruffles length? Because you will loose an inch when you sew the jeans to the ruffles where they join, and you will loose an inch when you make your bottom hem for your skirt. And yes, I did cut the bottom off my pockets, you can probably pin them up out of the way to avoid cutting them...I forgot about them actually...oops, it's an easy fix though.
Press the bottom width of the ruffles 1/2" towards the wrong side, then another 1/2" on both pieces. Put the ruffles on top of each other, right sides together and sew one of the lengths (short sides) together. Finish with your favorite finishing stitch, I used a wide zigzag. Press.
Baste stitch across the top width of the ruffles (long side that is not pressed), tie the stings together and knot on one end, then pull your bottom bobbin thread as you push your ruffle down to "ruffle" it. You want to even your ruffles out and make sure they are about the same width as your jeans. The picture below shows the ruffles folded in half along the seam line and when you do this, make sure you leave about 1/2" extra for each ruffle on the open end because you will need that for your seam allowance when you sew them together.
Pin the ruffles right sides together and sew the other side lengths (short sides) together.
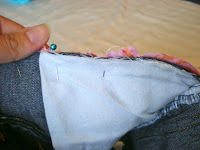
The jeans should be right side out and the ruffles should be inside out, and positioned as you see in the picture below. Slide the ruffles onto the jeans and place the raw sides together and pin, making a tube with both pieces. Make sure the seam lines all line up. Sew around the tube using a 1/2" seam allowance, back stitch when beginning and ending. Finish along the edge with a wide zigzag. See my pockets are sewn once again. ;) Sew the bottom hem and you are done!
Here are the best pics I could get of my 3 year old wearing her skirt. She does not like taking pictures for me and she thought it would be funny to leap over her chair for these pictures! My 16 month old however doesn't run from me...yet!
Subscribe to:
Comments (Atom)


