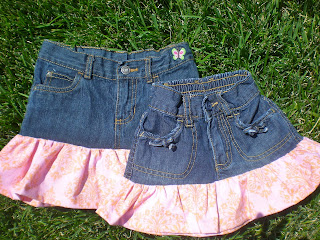
Free Tutorial Upcycled Jean Skirt for Toddlers


I have a lot of jeans that are not the right length anymore for my daughters, so I thought it would be fun to turn some jeans into skirts to get a little more use out of them!  I did a google search but I actually had a hard time finding "how to's" for upcycled toddler jean skirts.  I am by no mean's the "first" person to do this, but this how I made my jean skirts.

I cut just below the crotch area first so they looked like shorts.  Then I opened up the crotch area cutting along the seam line in the middle.

I wanted the jeans to be more of the "band" part, and not a entire jean skirt, so I folded the skirt in half, making sure to line the crotch area together and used the back part of the jeans as a straight edge.   I cut across about 1/2" under the pockets to make sure I would have enough room for the seam allowance and followed the line on the mat to make sure I was cutting straight across.


The next step was to open up the jeans and check the length, which was 7" and the width was 12". I wanted an 11" skirt for my 3 year old so 11"desired length - subtract 7" that I already have = 4" needed, and I added 2" to that for the seam allowance, so that makes the length of the ruffles 6" length x 24 width_( I used double the width of the jeans).  CUT 2.  Why 2" more to the ruffles length?  Because you will loose an inch when you sew the jeans to the ruffles where they join, and you will loose an inch when you make your bottom hem for your skirt.  And yes, I did cut the bottom off my pockets, you can probably pin them up out of the way to avoid cutting them...I forgot about them actually...oops, it's an easy fix though.


Press the bottom width of the ruffles 1/2" towards the wrong side, then another 1/2" on both pieces.  Put the ruffles on top of each other, right sides together and sew one of the lengths (short sides) together. Finish with your favorite finishing stitch, I used a wide zigzag. Press.


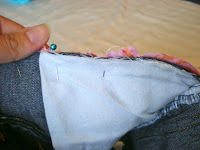
Baste stitch across the top width of the ruffles (long side that is not pressed), tie the stings together and knot on one end, then pull your bottom bobbin thread as you push your ruffle down to "ruffle" it.  You want to even your ruffles out and make sure they are about the same width as your jeans.  The picture below shows the ruffles folded in half along the seam line and when you do this, make sure you leave about 1/2" extra for each ruffle on the open end because you will need that for your seam allowance when you sew them together.


Pin the ruffles right sides together and sew the other side lengths (short sides) together.
The jeans should be right side out and the ruffles should be inside out, and positioned as you see in the picture below.  Slide the ruffles onto the jeans and place the raw sides together and pin, making a tube with both pieces. Make sure the seam lines all line up.  Sew around the tube using a 1/2" seam allowance, back stitch when beginning and ending.  Finish along the edge with a wide zigzag.  See my pockets are sewn once again. ;)   Sew the bottom hem and you are done!


Here are the best pics I could get of my 3 year old wearing her skirt.  She does not like taking pictures for me and she thought it would be funny to leap over her chair for these pictures!  My 16 month old however doesn't run from me...yet!


Sewing Labels free tutorial

I'm following The Monday Monkey Blog Hop this week. :)

I now have a "FAN" page! Lol!   A BIG thank you to Amanda from the blog Mommy of Two Little Monkeys for her help!  Now I can post new products and share on Facebook as well! :)  Here's my link to my page  to "like" my shop. ;)

http://www.facebook.com/pages/Pink-Poodle-Bows-Sewing-Patterns/262386013777533


Something fun to share.  I recently researched how to make my own sewing labels because I knew there had to be a way I could do it from home.  I found a great website that shared how to make your own sewing labels 5 different ways.  I chose to do the fabric paper that you can use with your home printer and I picked the sew-in version, but there are "iron on" versions of this paper if you prefer.

Here's how they turned out, cool huh?  I just followed the directions on the back of the packet and voila!  Cute little personalized labels!  I don't sell my clothing, I just give them away to friends or I make them for my daughters, but I thought that it would be neat to make labels and I even made some size labels as well!


Free Apron Tutorial, Basic Apron Pattern

Basic Apron Tutorial

Free Apron TutorialApron Pattern


Adult, Child and Doll Basic Apron Pattern
Materials: Adult’s Apron: 1 yard of fabric Child’s Apron: 1⁄2 yard fabric Doll’s Apron: 1 quarter of fabric Sewing machine, Thread Bobbin, Scissors, Iron, Pins
Size
Apron
(cut 1)


L      W
Bias tape (x2)


L     W
Pocket Main fabric
(cut 1)
L      W
Pocket top strip
(cut 1)

L     W
Pocket middle strip
(cut 1)
L     W
Adult
(one size)
30”x25”
42"x 2”
10” x17”
3”x17”
2”x 17”
Child
 (one size)
21”x17”
36”x2”
7”x 10”
 
3” x 10”
2”x 10”
doll
12”x 9”
18”x2”
3” x 6”
3” x 6” 
2”x 6”


Terms: (bs) backstitch when starting and ending.
(rsf) right side of fabric
(wsf) wrong side of fabric

Step One: Cut Your Pattern and fabric. You will need one apron piece, two bias tapes, one pocket piece and the two fabric strips at the top of the pocket.


Step Two: Cutting Your Armholes and Ironing
a) Fold your apron in half lengthwise, (wsf) towards each other. Put the
fold of fabric on the left side.
b) Place your armhole pattern at the top right side, making sure the straight edges line up along the open ends of the fabric. Pin in place.
c) Cut out your armhole.


More Pics!

I just received more adorable pics from Just A Crush Photography for my Bailey romper!  Isn't the baby girl she had as a model so adorable!  I just had to share! Thank you again Just A Crush Photography!  You can find her at:http://www.justacrushphotography.com


blogaholicnetwork.com

I just joined the blogaholicnetwork where you can talk with other bloggers, share ideas, ask each other questions and check out each others blogs!  You should check it out, here is the link below!  It's a great idea and easier way to find others with the same interests as you!  


Free Sewing Pattern Bonnet Tutorial


I wanted a bonnet to go with my peasant dress so I searched online and found a couple tutorials that I liked on these blogs:
http://givenmoments.blogspot.com/2008/01/bonnet-tutorial.html http://howtodresslikeapioneer.blogspot.com/2010/01/bonnet-tutorial.html

I tried to make my first one, but I made it too small, assuming that when she said the crown was 7"x14" and the brim was 3.5"x9"that those were the exact measurements.  I just cut them out using those measurements and ended up with what was about the size of bonnet for an American Girl Doll! Oh well, now she has a bonnet!  I would recommend using about a 5" piece of elastic if you want to make one for your doll. I obviously misunderstood!  So.... I tried again and tweeked mine a little to have a few additions and here is how my other one turned out.

First, cut out one large 14"x14" square for the crown.  Then cut out two 3.5"x18" pieces of fabric for the brim, one 3.5"x18" piece of fusible interfacing (I just had lightweight and it worked out fine), and two pieces of ribbon for the straps (Your desired length and width) I used ribbon that was 7/8"wide.  I also used a 1/4" wide elastic that I cut to 10" long and if you do this too, you will need two safety pins to use to thread it through the casing.


Take your 14"x14" crown and press one end 1/2", then another 1/2" to make the casing for the elastic at the bottom.  Fold it in half lengthwise and round the top corner.  Open it up and you should have a half circle at the top.


Press the interfacing onto one of the brim pieces, sticky side down towards the wrong side of fabric.  Place that piece on top of your other brim piece. Fold them in half width wise, (short sides together) and cut out a curve.  Press the bottom width (the longer straight edge) about 1/2" in on both pieces.


Open up the fold on the brim that you just made and pin the two straps (ribbon) pieces on the sides of the brim 1/2" up from the bottom width, the right side of the fabric should be facing up.  Lay the other brim piece on top, the right sides should be facing each other.  Pin the two pieces in place, make sure the straps don't move position.  It is ok if part of them is on the outside of the fabric, and make sure all folds are open.  Sew around the curve only using a 3/8" seam allowance, backstitch when beginning and ending.  Clip corners and turn the brim right side out and press, making sure the 1/2" fold in on the inside and press.


To make the crown,  sew an edge stitch across the 1/2" casing at the bottom, backstitch when beginning and ending.  Thread a piece of 1/4" elastic, I cut mine 10" long, through the casing using two safety pins. Use one pin to pin the elastic to the side of the fabric, and use the other to thread the elastic through.  Sew the elastic to the sides of the casing using about 1/4" seam allowance. Cut off the excess elastic.
 

Sew a baste stitch around the crown, from one side all the way up the curve and down to the other side. Do not cut off your excess thread or backstitch because you will need this to pull with.  Tie one sides strings together and knot, then pull the bottom thread only on the other side to ruffle the fabric.  Make it measure the same width as the brim's width and tie off the side you were pulling width.  Put the crown's baste stitch part inside the brim, pinning them together and sandwich the crown between the brim.  Sew them together across the brim where they meet, backstitch when starting and ending.  And now you should have a cute bonnet. :)  And this time it was the right size for my daughter!


I am so excited because I just finished making the pdf pattern for this dress!  It's called The Abigail Peasant Dress!  :)  Thanks for stopping by my blog!