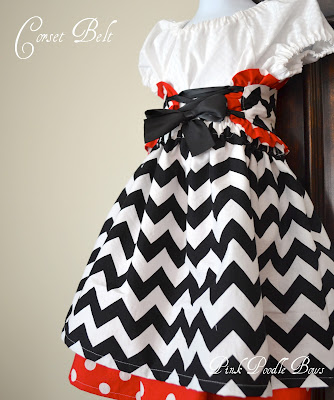
Free Tutorial, Pirate Corset Belt
Easy Sewing Project
To make the corset belt I measured my daughter's waist, which was 20". I decided to cut it 4" shorter to leave some space for the ribbon to be tied across her waist, therefore I cut the belt fabric 16" wide by 4" in length (x2 pieces). To make the ruffle, I used a 3" x 60" piece of red fabric and to make the loops I used four pieces of ½" wide ribbon cut about 3" long. The satin ribbon pictured above is what I used to thread through and tie the belt together.
I folded the two belt pieces in half and rounded the bottom corner on the open end, then folded that section up and cut a curve at the top as well to make the top section of the belt match the bottom section. (This is optional)
Folding two pieces of ribbon in half, I pinned them on the left side of one of the belt pieces, the right side of the belt fabric facing up. I sewed them in place, using about a ⅛" seam allowance, then repeated the same steps to add the loops to the right side of the belt as well.
The next step was to make the ruffle. I pressed the short sides in ½" towards the wrong side of fabric, then folded the fabric in half lengthwise, wrong sides together and pressed. I used a baste (gathering) stitch about ⅜" in, then repeated another stitch just above that one for extra support to pull and gather the ruffle.
After gathering the ruffle fabric, I pinned it onto the right side of the belt piece, making sure that the ruffle was facing inward. I slightly overlapped the ends of the ruffle so that it looked like one complete piece.
After adding the other belt fabric onto the top, right side down, I started to think that I probably should have added interfacing to make this fabric firmer…but I wanted it done and I was being lazy. :) If you are doing this project, adding interfacing would probably make sewing the two pieces together easier.
The last steps were to sew around the belt about ½" in, and leave a 4 or 5" gap to turn it right side out, then tuck in the fabric and ruffle and sew a top stitch around the inside of the belt. Somehow my loops decided that they wanted to not face straight! They were fine once I threaded the satin fabric through to complete the belt. And that was it!
Here's what the "Minnie Dress" looks like without the other pieces added to it. I used the Hailey PDF sewing pattern to make this and just made a solid skirt instead of the strips.
And here is a sneak peek of the skirt I am currently working on making a pdf pattern for! I added the skirt as a layer over the "Minnie Dress"to help complete the pirate dress look I was going for.


No comments:
Post a Comment
Comments are always welcome, thank you!