I have two days left until school is out! :) I'm so excited to start my vacation! We bought tickets to Disneyland for my daughters 3rd birthday and I have to get on it and start making some Mickey outfits for our trip! If only I had more hours in the day....or energy, sigh. Maybe I will get inspired when I go to the fabric store. :)
Today I am following the Wednesday blog hop. I am going to post the button on my sidebar if you would like to visit the site and join yourself!
On the Countdown!!!
Well I'm officially on the countdown! Yeah!!! I have next week and school is out! :) I can't wait to have more time to spend at home with my girls and have a little break from work! Not that I don't love my students, but we all need a little "brain break" so we can come back next year refreshed! lol! I have so much I want to do! I won an American Girl doll at our school carnival's silent auction (I got it for about half price!) so I was very excited about that! I can't wait to start making little doll dresses to match my "real girl" dresses! That is one of my fun summer projects! I can't wait to have my sewing time back too during "nap time." Hopefully I can get some more free tutorials up on this blog as well!
I'm following the TGIF blog hop again today! If you are visiting, thanks for stopping by!

Easy Baby Shower Center Piece Ideas
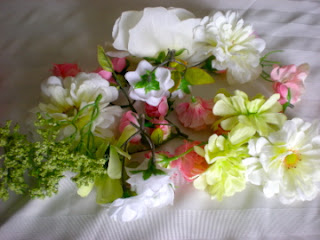
Next week I have the pleasure of helping with a shower and I was in charge of making some table decorations. I decided that I wanted the center table to have something other than a vase with fresh flowers, so I decided that I was going to attempt to make some decorative balls to go inside this large 18" glass cylinder vase. I went to my local craft store and picked up some styrofoam balls in some different sizes, some spanish moss, and a wood letter "R" since that will be her new last name. I already had some scrap ribbon, fabric and flowers that I was planning on using as well.
To finish the flower ball, I added some leaves to it. I had to place the glue onto the back of the leaves and just attach them to the ball that way because they did not have a sturdy enough "stem" to stick into the styrofoam ball.
Here is my mess of supplies! The little hands that will appear throughout this post is my three year old "A". She is my special helper today while her sissy "R" is taking a nap.
Modeling hair bows on a cold day
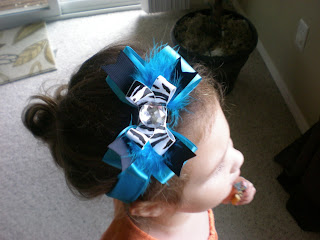
We are stuck inside the house today because it is too cold to go outside and we have had on and off rain, so I decided to have my 3 year old "A" model some of the bows from the tutorials I made! lol. She was not thrilled about this, but after a little convincing (cookie) she said ok. ;)
I'm on the countdown now for school to be out! Only 14 more days and then summer vacation! Yeah! We all need that break, my students and myself! I'm hoping to get a "how to make a diaper wipe cover" tutorial up soon since I've had some request for that and some other fun goodies! Become a follower to get the updates on the latest tutorials I put up...and let me know anything else you would like to see! :)
Free Tutorial Adding Layers to a Hair Bow
There are other ways to add layers to your bow, this is how I do it because I'm too lazy to sew them together! You will first need to make your "figure 8" bows. Refer to the tutorial on how to make a figure 8 bow on how to do this, then come back to this tutorial.
To add your layers to your bow, you first need to think about what you would like it to look like. You want to have coordinating colors, different sizes of ribbon and prints to add interest, and you can even add tulle or marabou and/or feathers. The combinations are endless! For this tutorial, I am going to make this blue bow, with two coordinating ribbons, blue marabou, and a large rhinestone. I will be attaching it to a stretchy headband as well.
Instant Downloads Soon!
I am so excited to be offering instant downloads soon! It has been fun...and challenging, learning all this computer lingo and how to link this to that, but I have been blessed to have had a lot of help along the way! Danielle from Ms Danielle Designs put together this beautiful blog site for me and I have been working on putting this pattern shop together to offer instant downloads of all my tutorials and printable patterns that I offer through my ETSY shop currently..... but without the waiting! It will be such a great addition to offer this to my customers and I can't wait until it is done! I am hoping that you find this to be a much more convenient way to purchase! I would be interested in hearing any requests or suggestions from you about patterns that you would like to see in my shop and what you would love to learn more about for my free tutorials section! I am working on a few more free tutorials as well! This is such a great creative outlet for me and I hope you find my tutorials and links to other tutorial blogs helpful to you as well! Please check out the buttons on the sides of my page, these women are amazing and offer a lot of great, free tutorials to try!
Ruffles and Stuff Blog
I love this blog! If you are into sewing you should check it out! She has so many free and fun tutorials!
http://www.rufflesandstuff.com/2009/08/tutorials.html
http://www.rufflesandstuff.com/2009/08/tutorials.html
Blog Hop
I'm new to this blog thing but I am going to definitely check out Blog hops this weekend! Check out the blog hop buttons on the side of my page or the attached links and visit all these great blogs!
All Week Long Blog Hop
TGIF
or visit these sites for these great bloghop directories!
http://www.marnisorganizedmess.com/2011/04/hop-hop/bloghop_11.html
http://www.freehotsamples.com/hop-library.php
All Week Long Blog Hop
TGIF
or visit these sites for these great bloghop directories!
http://www.marnisorganizedmess.com/2011/04/hop-hop/bloghop_11.html
http://www.freehotsamples.com/hop-library.php
This is so much fun!
Ok, I've been learning some new tricks! I finally figured out how to place links to my pictures on my blog! It took me a week, but I think I'm getting the hang of this thing! lol! I placed another bow tutorial on how to make a bow that has cute little ballerina shoes at the bottom! I have a lot more bow tutorials to come...and I'm going to be adding a lot more goodies on here soon! :)
How To Make a Basic Hair Bow Free tutorial
Here are the materials you will need to get started:
Ribbon (I am using a 5/8"width ribbon for this tutorial but you can use any size), string, hot glue gun, hot glue sticks, a lighter, scissors, alligator clips (you can find these metal single prong clips at a beauty supply store) control clips (also at a beauty supply store and usually come in a pack of 6)
1. Cut your ribbon about 12" long or your desired length.
2. Fold it in half and then fold it in half again.
Summer vacation around the corner!
I can't believe the school year is almost over! We get out a little earlier this year so I am looking forward to having more time at home with my little girls and sewing! I have a lot of new ideas and patterns I am working on, so I can't wait to get started! Here is a sneak peak at one of them. I am still trying to figure out this blog thing. I want to separate my tutorials into separate links on my page. :) And I thought I was pretty computer savy...but I guess there is a lot I don't know about! lol!
My New Blog!
I am so excited about having my own blog! Danielle from http://msdanielledesigns.com did such a wonderful job of designing my blog for me! I just love it! If you are thinking of revamping your blog you should definitely use her! She is so wonderful to work with!
I am new to this whole blog thing so I think it will take a while for me to work out some of the kinks! I would love any help any of you could offer me! I have a list of free tutorials that I want to add! I can't wait to get started, I think this is going to be so much fun!
A special thank you to my friend Patricia from It's About Time Mamaw for all of her help as well! She has been such a blessing and encouraged me to get this going! If you like my patterns but don't want to sew or know how to, you should check out her shop. http://itsabouttimemamaw.blogspot.com/
Subscribe to:
Posts (Atom)


